VoIP “How do I…” FAQs
Click a question below to see the answer.
1. How do I add a contact to my local directory using my Polycom phone?
- On the Home screen of your Polycom phone, navigate to Directories
- Select Contact Directory
- Select Add or Plus sign
- Enter the information needed and press Save
2. How do I change my voicemail options?
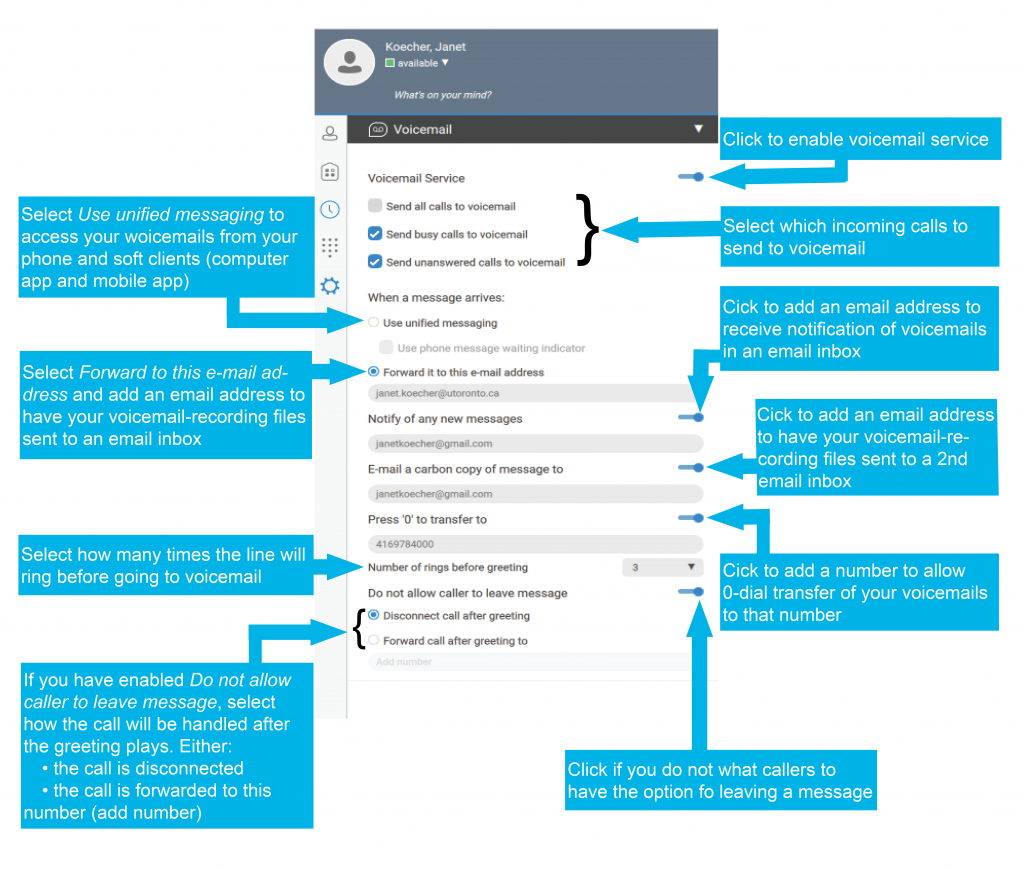
Your BroadConnect VoIP voicemail can be configured to your preferences
Voicemail-to-email is included in your VoIP Standard or Premium license, but needs to be activated and an email address added. Once activated, your voicemail messages will appear with attached .wav sound files, along with the caller’s ID, in the email inbox you have specified.
Setting Voicemail Preferences in Communicator 7
To set voicemail preferences in Communicator 7 on your computer, do the following:
Open Communicator 7 on your computer
Click the gear icon on the left to open Settings
Click the dark bar near the top and select Voicemail from the dropdown.
Please see the diagram below for a description and explanation of the options.
Voicemail-to-email is included in your VoIP Standard or Premium license, but needs to be activated and an email address added. Once activated, your voicemail messages will appear with attached .wav sound files, along with the caller’s ID, in the email inbox associated with your VoIP license.
3. How do I change my voicemail password using my Polycom phone?
Your BroadConnect VoIP voicemail can be configured to your preferences
Voicemail-to-email is included in your VoIP Standard or Premium license, but needs to be activated and an email address added. Once activated, your voicemail messages will appear with attached .wav sound files, along with the caller’s ID, in the email inbox you have specified.
Setting Voicemail Preferences in Communicator 7
To set voicemail preferences in Communicator 7 on your computer, do the following:
- Open Communicator 7 on your computer
- Click the gear icon on the left to open Settings
- Click the dark bar near the top and select Voicemail from the dropdown.
Please see the diagram below for a description and explanation of the options.
Voicemail-to-email is included in your VoIP Standard or Premium license, but needs to be activated and an email address added. Once activated, your voicemail messages will appear with attached .wav sound files, along with the caller’s ID, in the email inbox associated with your VoIP license.
4. How do I change the password for Communicator 7?
Communicator 7 is the application used for the communications tools available to you on your desktop and mobile devices. The password can be changed from the desktop version of the application. To change the password:
Reset the password using the Broadconnect portal link or
- Open Communicator 7 on your desktop computer
- On the left icon menu, click the settings icon (the gear icon), then click Forgot password? A new page will open
- Enter your username, which your 10-digit phone number (no dashes or spaces), and your email address. You will receive an email with a link to reset your password
- Click the link in the email. A new page will open
- Enter your new password in the two boxes.
- Password cannot contain login ID
- Password must contain at least one number
- Password must contain at least one uppercase alpha character
- Password must contain at least one lowercase alpha character
- Password must contain at least one non-alpha character
- Password must be a minimum of ten characters
5. How do I choose a headset for using VoIP on my computer?
You probably already know that you can make and receive calls on your computer with VoIP, but what kind of hardware do you need in addition to the computer?
The only additional hardware needed is either a headset, which includes earphones and a microphone, or, if you are not in a shared space, a microphone and/or speakers. There is a wide variety of options available at any of the well-known electronics retailers, so no specific models are recommended here; rather, below are some guidelines on what to look for when seeking a unit to connect to your computer. Apart from the factors mentioned here, there are the personal considerations of comfort and ease of use: these are quite unique to individuals and will depend on how long you need to wear the device in a day, what your particular use case is, and factors such as ear and head shape. A device that may be perfectly comfortable for one person to wear for a full day may irritate another person after only an hour, so some trial and error may be expected.
Connecting the audio devices
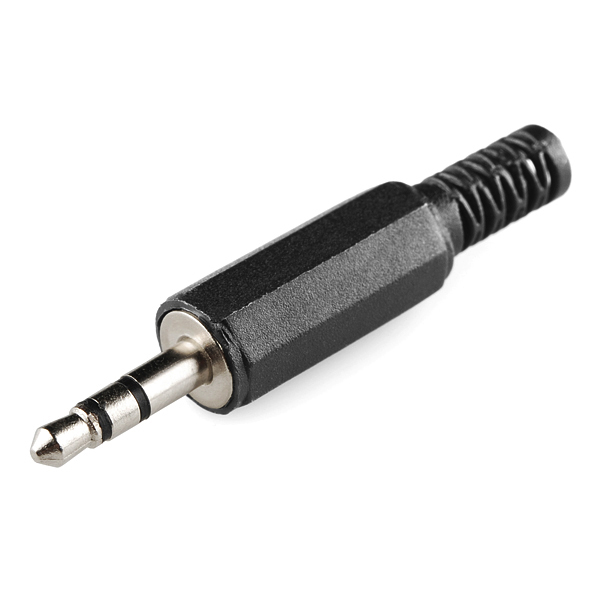
3.5mm headset jack
Depending on the capabilities of and connectors on your computer, the audio hardware can connect via Bluetooth, USB cable, or 3.5mm (mini) cable. The advantage of a Bluetooth headset is that you are not tethered to your computer; you can move a few meters away and remain connected to the call. Not all computers support Bluetooth, however, so make sure to check if yours does before going this route. USB and 3.5mm are the other common audio connector types for cabled devices; again, check your computer to see what yours has in term of inputs. Many newer computers don’t have jacks for 3.5mm connectors, and many older computers may not fully support the type of 3.5mm connector on headsets, so if you’re unsure, best to avoid these and go with Bluetooth or USB.
Plantronics, a popular headset manufacturer, has a proprietary connector called Quick Disconnect used on some of its wired headsets. You choose whether you need a USB or 3.5mm connector for connection to your desktop, and the Quick Disconnect allows you to easily disconnect your headset from that cable, enabling you to leave your station without removing your headset. See the Plantronics Quick Disconnect page for more information.
Headset Options
6. How do I delete messages from my voicemail box?
- Log in to the voicemail by dialing *86.
- Enter your password
- Press 7 to delete all messages
7. How do I enable or disable Call Forwarding from my Polycom phone?
To enable call forwarding:
- On the Home screen of your Polycom phone, select the “Forward” icon or press the More key, then press the Forward button.
- Select the Forwarding Type (Always, No answer or Busy)
- Enter the number to which you would like calls forwarded in the Contact box and press the ‘Enable‘ key
To disable call forwarding:
- On the Home screen of your Polycom phone, select the “Forward” icon or press the More key, then press the Forward button.
- Select the Forwarding Type (Always, No answer or Busy)
- Press the Disable key.
8. How do I initiate a 3-way conference call with my Polycom VVX411 phone?
To initiate a 3-way conference call with your Polycom VVX411 phone, do the following:
- While on an active call, press the More soft key on your Polycom VVX411, then press the Conference soft key. The first call is placed on hold
- Dial the 2nd number.
- When the 2nd party answers, press the More soft key, then press the Conference soft key to connect the calls.
9. How do I set up Two-Factor Authentication for the GoCo (BroadConnect) portal
When a VoIP user tries to sign in to the GoCo VoIP portal they will be directed to set up Two-Factor authentication. To access the portal you will need to set up Two Factor Authentication after April 23rd 2021.
GoCo has implemented Two-Factor Authentication as a security enhancement which will affect any VoIP user accessing the GoCo portal.
The options for the Two Factor Authentication are via a call or SMS Message. Please note the method cannot be changed after it has been enabled.
If authentication method needs to be changed or wrong number is entered please contact the VoIP Support Team to process your request as well as remove the old profile and have user re-enroll.
There is a 5 minute timeout to enter the token once selected.
Please click here for the information on setting up Two-Factor Authentication on the GoCo portal.
10. How should I choose my voicemail password?
There are minimum standards to ensure that your voicemail remains secure. Please create your voicemail password using the following guidelines:
- Minimum of 6 numberic characters
- Cannot be repeated numbers consecutively
- Cannot be the previous set password